Regular oil changes keep your car’s engine running smoothly and extend its lifespan significantly. Many car owners pay mechanics to perform this basic maintenance task, but you can easily learn to change your car’s oil yourself. This comprehensive guide walks you through every step of the process, from gathering the right tools to disposing of used oil properly.
Why Regular Oil Changes Matter for Your Vehicle
Motor oil serves as your engine’s lifeblood, lubricating moving parts and preventing costly damage. Fresh oil reduces friction between engine components, carries away heat, and traps harmful contaminants. Over time, oil breaks down and becomes contaminated with dirt, metal particles, and combustion byproducts.
Dirty oil cannot protect your engine effectively. It thickens and loses its lubricating properties, potentially causing severe engine damage. Regular oil changes prevent this deterioration and maintain optimal engine performance. Most manufacturers recommend changing oil every 3,000 to 7,500 miles, depending on your vehicle type and driving conditions.
Essential Tools and Materials You’ll Need
Before starting your oil change, gather all necessary equipment. Having everything ready saves time and prevents interruptions during the process.
Basic Tools Required:
- Socket wrench set or box-end wrenches
- Oil drain pan (capacity of at least 6 quarts)
- Funnel for adding new oil
- Jack and jack stands (or car ramps)
- Disposable gloves
- Safety glasses
- Paper towels or rags
Materials Needed:
- Correct type and amount of motor oil
- New oil filter
- New drain plug gasket (if needed)
Safety Equipment:
- Wheel chocks
- Work light or flashlight
- Cardboard to protect your driveway
Identifying the Right Oil and Filter for Your Car
Different vehicles require specific oil types and viscosities. Check your owner’s manual for the manufacturer’s recommendations. The manual specifies whether your engine needs conventional, high-mileage, or synthetic oil.
Oil viscosity ratings like 5W-30 or 10W-40 indicate the oil’s thickness at different temperatures. The first number represents cold-weather performance, while the second shows viscosity at operating temperature. Using the wrong viscosity can damage your engine or reduce fuel efficiency.
Your oil filter also requires careful selection. Filters vary by thread size, gasket diameter, and mounting configuration. Auto parts stores can help you find the correct filter using your vehicle’s year, make, model, and engine size.
Preparing Your Vehicle for the Oil Change
Start by warming your engine for about five minutes. Warm oil flows more easily and drains more completely than cold oil. However, avoid making the oil too hot, as this creates a burn hazard.
Park on level ground and engage the parking brake. Turn off the engine and remove the keys. Place wheel chocks behind the rear wheels if you’re lifting the front of the vehicle.
Pop the hood and locate the oil filler cap on top of the engine. Remove this cap to help oil drain more quickly. Some vehicles have an oil dipstick that doubles as the filler cap.
Safely Lifting Your Vehicle
You’ll need to access the oil drain plug underneath your car. Use a hydraulic jack to lift the front of the vehicle, then secure it with jack stands. Never work under a car supported only by a jack, as jacks can fail and cause serious injury.
Alternatively, use car ramps for a safer lifting method. Drive the front wheels onto the ramps slowly and carefully. Ramps provide stable support and don’t require jack stands.
Some vehicles have sufficient ground clearance for oil changes without lifting. However, most cars require elevation to access the drain plug comfortably.

Locating the Oil Drain Plug and Filter
Slide under the vehicle and locate the oil drain plug on the oil pan. The drain plug typically sits at the lowest point of the oil pan and looks like a bolt head. Some vehicles have multiple drain plugs, so consult your owner’s manual if you’re unsure.
Find the oil filter nearby. Filters usually mount on the side of the engine block or oil pan. They resemble metal canisters with threaded tops. Note the filter’s orientation before removal, as this helps with installation.
Clean around the drain plug and filter area with a rag. Removing dirt and debris prevents contamination of fresh oil and makes the job cleaner.
Draining the Old Oil
Position your drain pan slightly off-center from the drain plug. Oil often arcs out at an angle initially, then drops straight down as flow decreases. This positioning catches all the oil without requiring pan adjustment.
Use the appropriate wrench to loosen the drain plug. Turn counterclockwise, but be careful not to overtighten initially or strip the threads. Once loose, spin the plug out by hand to avoid dropping it into the drain pan.
Allow the oil to drain completely. This process typically takes 10-15 minutes. While waiting, you can remove the old oil filter.
Removing and Installing the Oil Filter
Oil filters contain about a cup of old oil, so keep your drain pan ready. Spin filters counterclockwise to remove them. If the filter is too tight to remove by hand, use an oil filter wrench.
Oil will spill when you remove the filter, so work carefully. Clean the filter mounting surface with a rag, removing any old gasket material that might have stuck.
Before installing the new filter, apply a thin coat of new oil to the rubber gasket. This helps the gasket seal properly and makes future removal easier. Thread the new filter on by hand until the gasket contacts the mounting surface, then tighten an additional 3/4 turn.
Avoid overtightening the oil filter. Hand-tight plus 3/4 turn provides adequate sealing without making future removal difficult.
Replacing the Drain Plug
Clean the drain plug and inspect the gasket. Replace the gasket if it’s damaged, cracked, or hardened. Some drain plugs use metal crush washers that should be replaced with every oil change.
Thread the drain plug back into the oil pan by hand first. This prevents cross-threading and damaged threads. Once the plug seats properly, tighten with a wrench.
Tighten the drain plug snugly but don’t overtighten. Most drain plugs require 15-25 foot-pounds of torque. Overtightening can strip the oil pan threads, requiring expensive repairs.
Adding New Oil to Your Engine
Lower the vehicle and move to the engine compartment. Insert your funnel into the oil filler hole and pour in the new oil slowly. Start with about one quart less than the total capacity to avoid overfilling.
Most passenger cars hold between 4-6 quarts of oil, while larger vehicles may require 6-8 quarts. Check your owner’s manual for the exact capacity.
Pour oil gradually to prevent splashing and allow air to escape from the crankcase. Rushing this step often leads to spills and overfilling.
Checking Oil Level and Final Steps
After adding most of the oil, wait several minutes for it to settle into the oil pan. Start the engine and let it run for a few minutes. This circulates new oil through the system and fills the new filter.
Turn off the engine and wait 5-10 minutes for the oil to settle again. Check the oil level using the dipstick. The oil should register between the minimum and maximum marks on the dipstick.
Add more oil if necessary, but do so gradually. Overfilling can cause engine damage by creating excessive pressure and causing oil foaming.
Replace the oil filler cap and dipstick securely. Check under the vehicle for any leaks around the drain plug or filter.
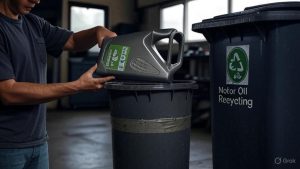
Proper Disposal of Used Oil and Filters
Used motor oil contains harmful contaminants and should never be poured down drains or onto the ground. Most auto parts stores, quick-lube shops, and service stations accept used oil for recycling.
Oil filters also require proper disposal. Drain filters thoroughly before taking them to recycling centers. Many locations that accept used oil also take used filters.
Save your oil change receipt and record the mileage. This documentation helps track maintenance intervals and may be required for warranty claims.
Common Mistakes to Avoid
Several common errors can turn a simple oil change into an expensive repair. Overtightening the drain plug or filter can cause leaks or damage. Using the wrong oil type or viscosity can harm your engine.
Double-check that you’ve removed the old filter gasket before installing the new filter. Two gaskets will cause leaks and potential engine damage.
Never start the engine without adding new oil first. Running an engine without oil, even briefly, can cause catastrophic damage.
Always verify you’ve replaced the drain plug before adding new oil. This obvious step is surprisingly easy to forget, leading to messy and expensive consequences.
When to Seek Professional Help
While changing oil is straightforward, some situations require professional assistance. If you discover stripped drain plug threads, damaged oil pans, or unusual metal particles in the old oil, consult a qualified mechanic.
Vehicles with complex underbody panels or difficult filter access might be better serviced professionally. Some modern cars require special tools or procedures that make DIY oil changes impractical.
Trust your instincts if something doesn’t seem right during the process. Professional mechanics can diagnose problems and prevent minor issues from becoming major repairs.
Benefits of Changing Your Own Oil
Learning to change your own oil saves money on labor costs and gives you better control over maintenance timing. You can choose premium oil and filters while still spending less than shop rates.
Regular DIY oil changes help you become familiar with your vehicle’s condition. You’ll notice leaks, worn components, or other issues that might go undetected otherwise.
The satisfaction of maintaining your own vehicle builds confidence for tackling other automotive maintenance tasks. Many car owners find oil changes to be relaxing, meditative work.
Conclusion
Changing your car’s oil ranks among the most important maintenance tasks you can perform. This relatively simple procedure protects your engine investment and ensures reliable transportation. With the right tools, materials, and knowledge, most car owners can successfully change their own oil.
Start with proper preparation, work safely, and take your time. Follow manufacturer specifications for oil type and capacity. Dispose of waste materials responsibly and keep accurate maintenance records.
Regular oil changes, whether performed at home or professionally, keep your engine running smoothly for years to come. The skills you develop during your first oil change will serve you well throughout your vehicle ownership experience.