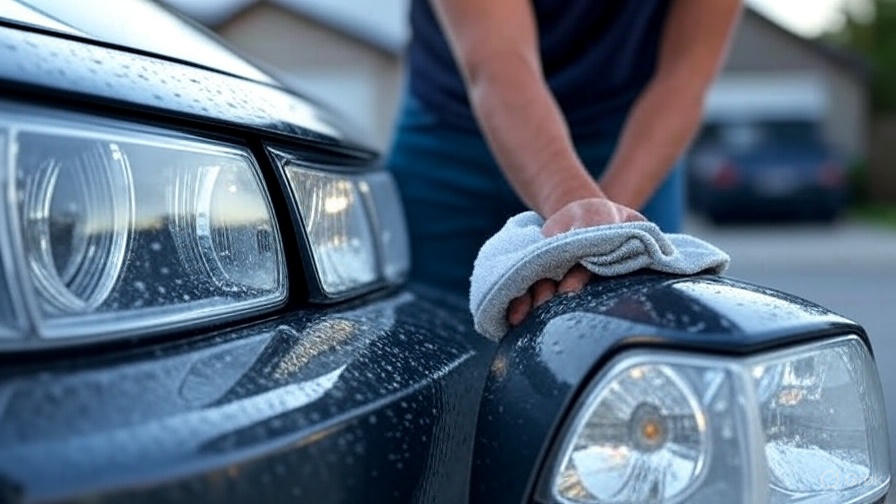
Cloudy headlights don’t just look bad – they create serious safety hazards. When your headlight lenses become foggy or yellowed, they reduce light output by up to 40%, making night driving dangerous for you and other motorists. The good news? You can restore your headlights to like-new condition using simple household items or professional-grade products.
This comprehensive guide walks you through multiple methods to clean foggy headlights, from basic DIY solutions to advanced restoration techniques. You’ll learn why headlights become cloudy, which cleaning methods work best, and how to prevent future oxidation.
Why Do Headlights Get Foggy and Yellow?
Modern car headlights use polycarbonate plastic instead of glass because it’s lighter, cheaper, and safer. However, polycarbonate has one major weakness: it degrades when exposed to UV rays from sunlight.
Over time, UV radiation breaks down the plastic’s molecular structure, causing oxidation on the outer surface. This oxidation appears as a cloudy, yellow, or milky film that blocks light transmission. Road debris, chemicals from car washes, and environmental pollutants accelerate this degradation process.
Heat from the headlight bulbs also contributes to the problem. High-intensity discharge (HID) and halogen bulbs generate significant heat, which speeds up the oxidation process from the inside out.
Signs Your Headlights Need Cleaning
Recognizing early signs of headlight degradation helps you address the problem before it becomes severe:
- Reduced brightness during night driving
- Yellow or amber tinting on the lens surface
- Cloudy or hazy appearance when viewed from the side
- Rough texture when you run your finger across the lens
- Uneven light distribution or dark spots in the beam pattern
- Difficulty seeing road signs or lane markings at night
Method 1: Toothpaste Cleaning Technique
Toothpaste contains mild abrasives that can remove light oxidation from headlight lenses. This method works best for headlights with minor cloudiness.
Materials Needed:
- Regular toothpaste (not gel)
- Clean microfiber cloths
- Water
- Masking tape
- Spray bottle
Step-by-Step Process:
Step 1: Prepare the Work Area Park your car in a shaded area away from direct sunlight. Clean the headlight area with soap and water to remove dirt and debris. Dry completely with a clean towel.
Step 2: Mask the Surrounding Area Apply masking tape around the headlight housing to protect the paint and trim pieces. Cover any nearby sensors or electrical components.
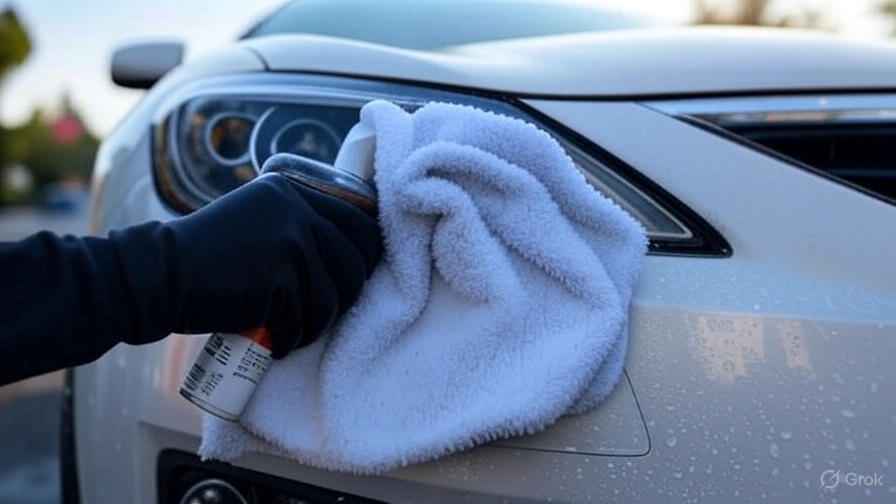
Step 3: Apply Toothpaste Squeeze a generous amount of regular toothpaste onto a damp microfiber cloth. Spread the toothpaste evenly across the headlight lens in circular motions.
Step 4: Scrub the Surface Work the toothpaste into the plastic using firm, circular motions. Focus on areas with heavy oxidation. Continue scrubbing for 2-3 minutes per headlight.
Step 5: Rinse and Inspect Rinse the headlight thoroughly with clean water. Dry with a microfiber cloth and inspect your progress. Repeat the process if necessary.
Step 6: Final Polish Apply a thin layer of car wax or plastic polish to protect the restored surface.
Method 2: Baking Soda and Vinegar Solution
This natural cleaning method combines the abrasive properties of baking soda with vinegar’s acidic cleaning power.
Materials Required:
- 2 tablespoons baking soda
- 1 cup white vinegar
- Soft-bristled toothbrush
- Microfiber cloths
- Spray bottle
- Protective gloves
Cleaning Process:
Step 1: Create the Cleaning Paste Mix baking soda with a small amount of water to form a thick paste. The consistency should be similar to toothpaste.
Step 2: Apply the Paste Spread the baking soda paste evenly across the headlight lens. Use your fingers or a soft cloth to ensure complete coverage.
Step 3: Let It Work Allow the paste to sit for 5-10 minutes. This gives the baking soda time to break down the oxidation.
Step 4: Scrub Gently Use a soft-bristled toothbrush to scrub the paste in circular motions. Apply gentle pressure to avoid scratching the plastic.
Step 5: Rinse with Vinegar Spray white vinegar over the baking soda paste. The combination will fizz and bubble, helping to lift stubborn oxidation.
Step 6: Final Rinse Rinse thoroughly with clean water and dry with a microfiber cloth.
Method 3: Commercial Headlight Restoration Kits
Professional restoration kits provide the most thorough results for severely oxidized headlights. These kits include various grits of sandpaper, polishing compounds, and protective coatings.
Popular Kit Brands:
- Meguiar’s Heavy Duty Headlight Restoration Kit
- Chemical Guys Headlight Restore and Protect Kit
- Turtle Wax Headlight Lens Restorer Kit
- 3M Headlight Restoration System
Using a Restoration Kit:
Step 1: Assess the Damage Examine your headlights under bright light to determine the severity of oxidation. This helps you choose the correct starting grit.
Step 2: Wet Sand the Surface Start with the coarsest sandpaper included in your kit (usually 400-600 grit). Wet the sandpaper and headlight surface. Sand in horizontal strokes, applying light pressure.
Step 3: Progress Through Grits Move to finer grits (800, 1000, 2000) in sequence. Each grit removes scratches from the previous step while smoothing the surface.
Step 4: Apply Polishing Compound Use the included polishing compound with a microfiber cloth. Work in circular motions until the lens becomes clear and smooth.
Step 5: Apply UV Protection Most kits include a UV-resistant clear coat. Apply this according to the manufacturer’s instructions to prevent future oxidation.
Method 4: Bug Spray Method
This unconventional method uses DEET-based insect repellent to dissolve oxidation. The DEET acts as a solvent that breaks down the cloudy layer.
Important Safety Notes:
- Use only DEET-based bug spray
- Work in a well-ventilated area
- Wear gloves and eye protection
- Keep spray away from paint and rubber seals
Application Process:
Step 1: Clean the Headlight Remove all dirt and debris from the headlight surface.
Step 2: Mask Surrounding Areas Thoroughly mask all paint, rubber, and plastic trim around the headlight. Bug spray can damage these materials.
Step 3: Apply Bug Spray Spray a liberal amount of DEET-based insect repellent onto a clean cloth. Do not spray directly on the headlight.
Step 4: Rub the Surface Work the bug spray into the headlight lens using circular motions. The oxidation should begin dissolving immediately.
Step 5: Remove Residue Wipe away all bug spray residue with a clean, damp cloth. Rinse thoroughly with water.
Step 6: Apply Protection Clean the lens with soap and water, then apply a UV-protective coating.
Method 5: Professional Sandpaper Restoration
For heavily oxidized headlights, wet sanding provides the most effective restoration. This method requires patience and proper technique.
Required Materials:
- Automotive sandpaper (400, 600, 800, 1000, 2000 grit)
- Spray bottle with water
- Polishing compound
- Microfiber cloths
- Masking tape
- UV-resistant clear coat
Detailed Process:
Step 1: Surface Preparation Clean the headlight thoroughly and mask all surrounding areas. Inspect the lens for cracks or deep scratches that might require professional repair.
Step 2: Start with 400 Grit Wet the 400-grit sandpaper and the headlight surface. Sand in horizontal strokes with light pressure. Keep the surface wet at all times to prevent heat buildup.
Step 3: Progress Through Grits After completing 400 grit, move to 600, then 800, 1000, and finally 2000 grit. Each step should remove scratches from the previous grit while making the surface smoother.
Step 4: Check Your Progress After each grit, clean the surface and inspect your work. The headlight should gradually become clearer with each step.
Step 5: Polish to Clarity Apply polishing compound with a microfiber cloth. Work in circular motions until the headlight achieves optical clarity.
Step 6: Apply Protective Coating Finish with a UV-resistant clear coat to prevent future oxidation.
Prevention Tips: Keep Your Headlights Clear
Preventing headlight oxidation is easier and cheaper than restoration:
Regular Cleaning Wash your headlights weekly with soap and water. Remove road salt, chemicals, and debris before they can cause damage.
UV Protection Park in shaded areas when possible. Use a car cover or garage to protect your vehicle from UV exposure.
Apply Protective Coatings Use UV-resistant sprays or films designed for headlight protection. Reapply these products every 6-12 months.
Professional Maintenance Have your headlights inspected during regular service appointments. Early intervention prevents major restoration projects.
When to Replace vs. Restore
Sometimes replacement makes more sense than restoration:
Replace When:
- Headlight housings are cracked or damaged
- Internal reflectors are deteriorated
- Multiple restoration attempts have failed
- Safety regulations require it
Restore When:
- Only the outer lens is cloudy
- No structural damage exists
- Cost of restoration is significantly less than replacement
- Original equipment quality is desired
Safety Considerations
Headlight restoration involves chemicals and abrasives that require proper safety measures:
Personal Protection Always wear safety glasses and gloves when using chemicals or sandpaper. Work in well-ventilated areas to avoid inhaling fumes.
Vehicle Protection Mask all surrounding surfaces before starting any restoration process. Many cleaning chemicals can damage paint, rubber, and plastic components.
Proper Lighting Work in good lighting conditions to assess your progress accurately. Poor lighting can lead to uneven results or missed spots.
Cost Comparison: DIY vs. Professional
DIY Methods:
- Toothpaste method: $3-5
- Baking soda and vinegar: $2-4
- Commercial restoration kit: $15-30
- Professional sandpaper method: $20-40
Professional Services:
- Headlight restoration service: $75-150
- Complete headlight replacement: $200-800 per side
Common Mistakes to Avoid
Using Household Cleaners Never use ammonia-based cleaners, bleach, or harsh solvents on headlight lenses. These chemicals can cause permanent damage.
Skipping Surface Preparation Always clean and mask the area properly before starting restoration. Shortcuts lead to poor results and potential damage.
Working in Direct Sunlight Heat from sunlight interferes with many restoration products and can cause uneven results.
Rushing the Process Take your time with each step. Proper restoration requires patience and attention to detail.
Conclusion
Foggy headlights are more than just a cosmetic issue – they’re a safety hazard that requires immediate attention. With the methods outlined in this guide, you can restore your headlights to like-new condition and improve your nighttime visibility.
Start with gentler methods like toothpaste or baking soda for minor oxidation. For heavily clouded headlights, invest in a commercial restoration kit or try the wet sanding method. Remember that prevention is always better than restoration, so protect your newly cleaned headlights with UV-resistant coatings and regular maintenance.
Clear headlights not only improve safety but also enhance your vehicle’s appearance and resale value. Take action today to restore your headlights and drive with confidence knowing you have maximum visibility on the road.