Your car’s headlights serve as your eyes on the road, cutting through darkness and ensuring safe navigation during nighttime drives. When these essential components fail, you face immediate safety concerns that demand quick action. Many drivers assume that headlight replacement requires professional assistance, but the truth is that most people can handle this task with basic tools and proper guidance.
Car manufacturers design modern vehicles with user-friendly headlight systems that allow for straightforward bulb replacement. This accessibility means you can save money on labor costs while gaining valuable knowledge about your vehicle’s maintenance needs. The process typically takes 15 to 45 minutes, depending on your car’s make and model.
Types of Car Headlight Bulbs
Halogen Headlight Bulbs
Halogen bulbs represent the most common type found in vehicles today. These bulbs produce light by heating a tungsten filament inside a glass envelope filled with halogen gas. The filament glows white-hot, creating the illumination that lights your path.
Most halogen headlights use standard bulb types like H1, H3, H4, H7, H11, or 9006. Each designation refers to specific connection types and power ratings. Halogen bulbs typically last 500 to 1,000 hours of use, making them relatively short-lived compared to other options.
The main advantage of halogen bulbs lies in their affordability and widespread availability. You can find replacement halogen bulbs at virtually any auto parts store, gas station, or online retailer. Installation remains simple since these bulbs fit into existing headlight housings without modification.
HID Xenon Headlights
High-Intensity Discharge (HID) xenon headlights create light through an electric arc between two electrodes inside a xenon gas-filled bulb. This technology produces significantly brighter and whiter light compared to halogen alternatives.
HID systems require a ballast unit that regulates electrical current to the bulb. This ballast converts your car’s 12-volt power to the higher voltage needed for xenon operation. The result is a distinctive blue-white light that provides excellent road visibility.
These headlights last considerably longer than halogen bulbs, often reaching 2,000 to 3,000 hours of operation. However, replacement costs run higher, and the installation process can be more complex due to the ballast system.
LED Headlight Technology
Light-Emitting Diode (LED) headlights represent the newest advancement in automotive lighting. These systems use semiconductor technology to produce light when electrical current passes through specialized diodes.
LED headlights offer exceptional longevity, often lasting 25,000 to 50,000 hours. They consume less electrical power than halogen or HID alternatives while producing bright, clear illumination. The instant-on capability means LED lights reach full brightness immediately, unlike HID bulbs that require warm-up time.
The main drawback involves higher upfront costs and potential compatibility issues with older vehicles. Some LED replacements require additional components or modifications to work properly with existing electrical systems.
Essential Tools and Materials
Basic Hand Tools
Start by gathering a basic toolkit that includes both flathead and Phillips head screwdrivers. These tools help remove clips, screws, and covers that secure headlight assemblies. Socket wrenches in various sizes prove useful for cars that use bolts instead of clips.
Needle-nose pliers assist with handling small clips and connectors in tight spaces. A flashlight or headlamp provides essential visibility when working in dimly lit areas under the hood. Clean rags or paper towels help wipe away dirt and fingerprints during the installation process.
Safety Equipment
Safety glasses protect your eyes from debris and broken glass fragments. Work gloves prevent cuts from sharp edges and provide better grip when handling bulbs and components. These simple precautions can prevent injuries that turn a straightforward task into a medical emergency.
Replacement Parts
Identify your vehicle’s exact bulb type before purchasing replacements. Check your owner’s manual, existing bulb markings, or use online compatibility tools provided by parts retailers. Consider buying bulbs in pairs since headlights often fail around the same time.
High-quality bulbs from reputable manufacturers provide better performance and longevity compared to generic alternatives. Brands like Philips, Osram, Sylvania, and GE offer reliable options across different price ranges.
Step-by-Step Headlight Replacement Process
Preparation and Safety
Park your vehicle on level ground and engage the parking brake. Turn off the engine and remove the keys from the ignition. Allow the engine to cool completely if you’ve been driving, as engine components can reach dangerous temperatures.
Pop the hood and locate the hood release mechanism. Most cars have a primary release lever inside the cabin and a secondary safety latch under the hood. Prop the hood open using the support rod.
Clean your hands thoroughly before beginning work. Oil and dirt from your fingers can damage new bulbs and reduce their lifespan. Some bulb types are particularly sensitive to skin oils.
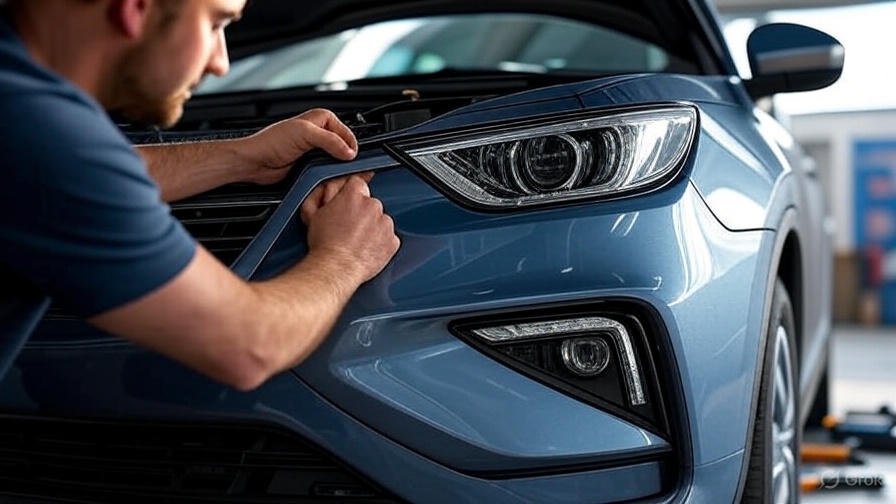
Accessing the Headlight Assembly
Locate the back of the headlight assembly behind the bulb housing. Most vehicles provide access from the engine compartment, though some models require removing the headlight unit entirely.
Look for plastic covers or dust caps that protect the bulb connections. These covers typically twist off counterclockwise or pull straight off, depending on the design. Set these covers aside in a safe location where they won’t get lost or damaged.
Some vehicles place headlight assemblies in challenging locations surrounded by other engine components. You might need to remove air intake ducts, battery boxes, or other parts to gain adequate working space.
Removing the Old Bulb
Disconnect the electrical connector from the back of the old bulb. These connectors usually have a tab or clip that you press while pulling the connector away from the bulb base. Handle this connection gently to avoid damaging the wiring harness.
Most headlight bulbs secure in place using one of several retention methods. Spring clips hold the bulb against the housing and require you to unhook or push aside the clip mechanism. Twist-lock bulbs require a quarter-turn counterclockwise to release. Some bulbs simply pull straight out of their sockets.
Examine the old bulb for signs of damage or wear. Blackened glass, broken filaments, or loose connections indicate normal failure modes. Take note of how the old bulb was positioned to ensure proper installation of the replacement.
Installing the New Headlight Bulb
Handle the new bulb carefully, avoiding contact with the glass surface. Hold the bulb by its base or use clean gloves to prevent oil contamination. Even small amounts of skin oil can create hot spots that cause premature bulb failure.
Insert the new bulb into the headlight housing using the same orientation as the old bulb. Most bulbs have alignment tabs or notches that ensure proper positioning. The bulb should seat fully without forcing or excessive pressure.
Secure the bulb using the same retention method that held the original. Spring clips should snap into place with a audible click. Twist-lock bulbs require a quarter-turn clockwise until they stop rotating. Verify that the bulb sits securely and cannot move or rattle.
Reconnecting Electrical Components
Push the electrical connector firmly onto the new bulb’s base until it clicks into place. The connector should fit snugly without gaps or loose connections. A properly connected plug provides stable electrical contact and prevents moisture intrusion.
Replace any dust covers or protective caps that you removed during disassembly. These components prevent moisture and debris from entering the headlight housing, which can cause premature bulb failure or electrical problems.
Testing Your New Headlight Installation
Initial Function Check
Before closing the hood, test the new headlight to confirm proper operation. Turn on the vehicle’s electrical system without starting the engine. Activate the headlight switch to verify that both low and high beam functions work correctly.
Walk around to the front of your vehicle to visually inspect the light output. The new bulb should produce bright, even illumination without flickering or dark spots. Compare the light color and intensity to the opposite headlight to ensure consistency.
If you replaced both bulbs simultaneously, check that both lights turn on and off together. Mismatched bulbs or improper connections can cause one light to fail while the other operates normally.
Alignment Verification
Proper headlight alignment ensures optimal road illumination without blinding oncoming drivers. Park your vehicle 25 feet away from a flat wall or garage door during evening hours. Turn on the headlights and observe the light pattern on the wall.
The brightest portion of each headlight beam should hit the wall at or slightly below the height of your headlight assemblies. The beam pattern should be relatively even between left and right sides. Significant differences in height or angle indicate alignment problems.
Most vehicles have headlight adjustment screws located behind or beside each headlight assembly. These screws allow you to fine-tune the vertical and horizontal aim of each light. Consult your owner’s manual for specific adjustment procedures.
Common Problems and Solutions
Bulb Compatibility Issues
Not all replacement bulbs work correctly in every vehicle. Some cars require specific bulb types with particular base configurations or power ratings. Using incorrect bulbs can cause electrical problems, poor light output, or premature failure.
Check multiple sources to verify bulb compatibility before making purchases. Your owner’s manual provides the most reliable information, but online compatibility tools from parts retailers offer convenient alternatives. When in doubt, bring your old bulb to the parts store for comparison.
Aftermarket LED or HID bulbs designed to replace halogen units sometimes cause compatibility problems. These upgrades might trigger dashboard warning lights, interfere with other electrical systems, or fail to fit properly in existing housings.
Electrical Connection Problems
Loose or corroded electrical connections prevent proper bulb operation. Symptoms include flickering lights, intermittent operation, or complete failure of new bulbs. These problems often result from moisture intrusion or normal wear over time.
Clean electrical connections using contact cleaner or fine sandpaper to remove corrosion. Ensure that connectors fit tightly without gaps or loose contact. Consider applying dielectric grease to connections in areas prone to moisture exposure.
Damaged wiring harnesses require professional repair or replacement. Signs of harness damage include melted or burned wires, exposed copper, or connectors that won’t stay attached. These problems can create safety hazards and should be addressed immediately.
Headlight Housing Issues
Cloudy or yellowed headlight lenses reduce light output even with new bulbs installed. This common problem results from UV exposure and environmental contamination over time. Polishing kits can restore clarity to plastic headlight lenses.
Cracked or damaged headlight housings allow moisture to enter, which can cause new bulbs to fail quickly. Small cracks might be repairable with plastic welding or sealants, but major damage typically requires complete housing replacement.
Water accumulation inside headlight assemblies indicates seal failure. This moisture can cause electrical problems and reduce bulb life. Address seal problems promptly to prevent ongoing issues.
Maintenance Tips for Extended Bulb Life
Regular Inspection Schedule
Check your headlights monthly during routine vehicle maintenance. Look for dim output, flickering operation, or visible damage to bulbs and housings. Early detection of problems prevents roadside failures and maintains optimal visibility.
Clean headlight lenses regularly using automotive glass cleaner and soft cloths. Remove insects, road grime, and other debris that can block light output. Avoid using harsh chemicals or abrasive materials that might damage plastic lenses.
Inspect electrical connections annually or whenever you notice performance changes. Clean connections and apply dielectric grease as needed to prevent corrosion and ensure reliable operation.
Driving Habits That Extend Bulb Life
Avoid unnecessary use of high-beam headlights, which consume more power and generate additional heat. Use high beams only when needed for visibility and switch back to low beams when approaching other vehicles.
Turn off headlights promptly when parking to prevent unnecessary bulb operation. Some vehicles have automatic headlight systems that turn lights off after a preset delay, but manual systems require driver attention.
Address electrical system problems promptly, as voltage irregularities can shorten bulb life. Signs of electrical issues include rapidly failing bulbs, flickering lights, or dashboard warning indicators.
Cost Considerations and Money-Saving Tips
DIY vs Professional Installation
Professional headlight replacement typically costs $50 to $150 per bulb including labor charges. This cost varies significantly based on your location, the shop’s hourly rate, and bulb type. Luxury vehicles or complex installations command higher prices.
DIY installation eliminates labor costs and allows you to choose your preferred bulb brand and quality level. The time investment runs 15 to 45 minutes for most vehicles, making this an excellent weekend project for car owners.
Consider professional installation for complex systems involving ballasts, extensive disassembly, or when you lack confidence in your mechanical abilities. The additional cost might be worthwhile to avoid potential damage or safety issues.
Bulb Quality and Value
Premium bulbs cost more upfront but often provide better performance and longer life compared to budget alternatives. Quality bulbs typically offer improved light output, longer lifespan, and better resistance to vibration and temperature extremes.
Budget bulbs work adequately for basic transportation needs but might require more frequent replacement. Calculate the total cost of ownership including replacement frequency when comparing options.
Consider upgrading to higher-performance bulbs if you frequently drive in challenging conditions. These bulbs provide better visibility during bad weather or nighttime driving, potentially improving safety.
Conclusion
Changing your car’s front headlight bulbs represents an achievable DIY project that saves money while providing valuable mechanical experience. Most drivers can complete this task successfully with basic tools and careful attention to proper procedures.
Start by identifying your vehicle’s specific bulb requirements and gathering the necessary tools and replacement parts. Follow safety procedures throughout the process, particularly when handling new bulbs and working around electrical connections.
Take your time during installation to ensure proper bulb seating and secure electrical connections. Test the completed installation thoroughly before considering the job finished. Regular maintenance and inspection help maximize bulb life and maintain optimal visibility.
Remember that headlight maintenance involves more than just bulb replacement. Keep lenses clean, address housing problems promptly, and monitor electrical connections for signs of wear or corrosion. These simple steps help ensure reliable operation and extend the life of your lighting system.
The confidence gained from successfully completing headlight replacement often encourages car owners to tackle other maintenance tasks. This mechanical knowledge helps you better understand your vehicle while potentially saving hundreds of dollars in professional service costs over time.