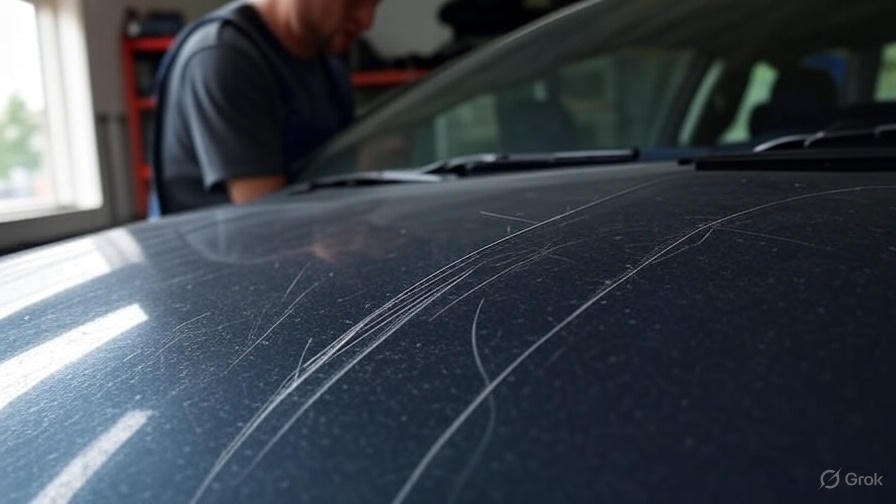
Car scratches happen to everyone. You walk out to your vehicle and discover an unsightly mark across your pristine paint job. Your heart sinks as you wonder about expensive repair costs. The good news? Most scratches can be fixed at home with the right techniques and materials.
This comprehensive guide walks you through everything you need to know about car scratch repair. You’ll learn to identify different types of scratches, gather the proper tools, and execute professional-quality repairs that save hundreds of dollars.
Types of Car Scratches and How to Identify Them
Before attempting any repair, you must understand what type of scratch you’re dealing with. Different scratches require different approaches, and using the wrong method can make things worse.
Clear Coat Scratches
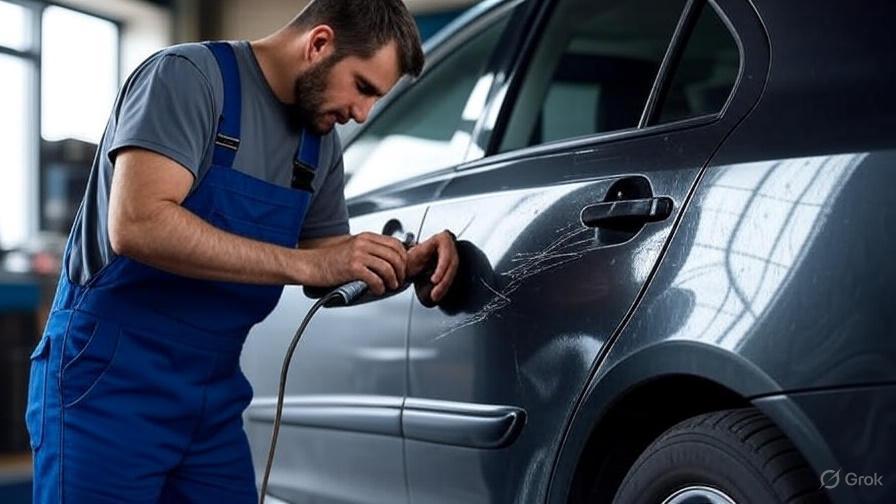
Clear coat scratches are the most common and easiest to repair. These surface-level marks only affect the transparent protective layer on top of your paint. You can perform a simple fingernail test to identify them. Run your fingernail across the scratch. If your nail doesn’t catch, you’re dealing with a clear coat scratch.
These scratches often appear as light, silvery lines on your car’s surface. They typically result from car washes, tree branches, or light contact with other objects. The paint underneath remains intact, making repair straightforward.
Paint Scratches
Paint scratches go deeper than the clear coat and penetrate the colored paint layer. Your fingernail will catch when you run it across these scratches. They appear more pronounced and often show a different color than your car’s paint.
These scratches occur from keys, shopping cart impacts, or more severe contact with objects. They require more extensive repair work but remain manageable for DIY fixes.
Primer Scratches
Primer scratches cut through both the clear coat and paint layers, exposing the primer underneath. These deep gouges often appear white or gray, regardless of your car’s color. They result from significant impacts or deliberate vandalism.
While more challenging to repair, primer scratches can still be fixed at home with patience and the right materials.
Metal Scratches
The deepest and most serious scratches expose bare metal. These require immediate attention to prevent rust formation. They appear as dark lines showing the metal substrate beneath all paint layers.
Metal scratches need professional-grade repair techniques and materials. However, with proper preparation and materials, determined DIY enthusiasts can tackle them.
Essential Tools and Materials for Scratch Repair
Success in scratch repair depends heavily on having the right tools and materials. Here’s what you’ll need for different types of repairs.
Basic Cleaning Supplies
Start with thorough cleaning supplies. You’ll need car wash soap, microfiber cloths, and clean water. Proper cleaning removes dirt and debris that could interfere with repair materials or cause additional scratches during the repair process.
Isopropyl alcohol helps remove any remaining contaminants and ensures proper adhesion of repair products. Use at least 70% concentration for best results.
Polishing and Buffing Materials
Polishing compound forms the backbone of clear coat scratch repair. Choose a high-quality automotive polishing compound that matches your needs. Fine compounds work for light scratches, while coarser compounds handle deeper marks.
Microfiber applicator pads distribute compounds evenly and prevent additional scratching. Avoid terry cloth or other materials that might leave lint or cause swirl marks.
A buffer or polishing machine speeds up the process and provides more consistent results than hand application. Orbital buffers work well for beginners, while rotary buffers offer more power for experienced users.
Touch-Up Paint and Primers
For deeper scratches, you’ll need touch-up paint that matches your car’s color exactly. Check your vehicle identification number (VIN) or paint code (usually found on a sticker in the door jamb) to ensure perfect color matching.
Automotive primer helps paint adhere properly and provides a smooth base for color application. Choose primer specifically designed for automotive use.
Clear coat protects the paint and provides the glossy finish that matches the rest of your car. Apply it over touch-up paint for professional-looking results.
Sandpaper and Wet Sanding Supplies
For deep scratches, you’ll need various grits of automotive sandpaper. Start with 2000-grit for light sanding and have 1500-grit and 1000-grit available for deeper work.
Wet sanding blocks ensure even pressure and prevent gouging. Keep plenty of clean water available for the wet sanding process.
Step-by-Step Clear Coat Scratch Repair
Clear coat scratches are the most common type you’ll encounter. Here’s how to fix them like a professional.
Preparation Phase
Begin by thoroughly washing the scratched area with car wash soap and clean water. Remove all dirt, grime, and debris from the scratch and surrounding area. Dry completely with a clean microfiber cloth.
Examine the scratch in good lighting to confirm it’s only a clear coat scratch. The fingernail test should show no catching if it’s truly surface-level.
Clean the area with isopropyl alcohol to remove any remaining contaminants. This step ensures the polishing compound will work effectively.
Applying Polishing Compound
Apply a small amount of polishing compound to a microfiber applicator pad. You don’t need much – a dab about the size of a pea covers a significant area.
Work the compound into the scratch using circular motions. Apply moderate pressure and work the compound until it becomes clear or nearly transparent. This indicates the abrasives are working to level the scratch.
Expand your circular motions to blend the repair area with the surrounding clear coat. This prevents creating a visible repair spot that stands out from the rest of the panel.
Buffing and Finishing
Remove excess polishing compound with a clean microfiber cloth. Use light pressure and work in straight lines rather than circles to avoid creating swirl marks.
If the scratch remains visible, repeat the polishing process. Sometimes multiple applications are necessary for complete removal.
Once satisfied with the scratch repair, apply a coat of car wax to protect the area and restore the original shine. The repaired area should blend seamlessly with the surrounding paint.
Paint Scratch Repair Techniques
Paint scratches require more intensive repair methods since they penetrate beyond the clear coat.
Assessment and Preparation
Confirm the scratch depth by performing the fingernail test. Paint scratches will catch your fingernail and often show different colored material in the scratch groove.
Clean the area thoroughly as described in the clear coat repair section. Paint scratches often collect more dirt and debris, so extra cleaning attention pays off.
Mask the area around the scratch with automotive tape to protect surrounding paint from accidental damage during repair.
Sanding Process
Light sanding helps create a smooth surface for paint application. Use 2000-grit sandpaper with plenty of water to wet sand the scratch gently.
Sand in one direction only – back and forth along the length of the scratch. Avoid circular motions that can create additional marks.
The goal is to feather the edges of the scratch, not remove all the surrounding paint. Stop sanding when the scratch edges feel smooth to the touch.
Clean away all sanding residue with clean water and dry thoroughly.
Paint Application
Apply thin coats of touch-up paint using a fine brush or touch-up pen. Multiple thin coats produce better results than one thick application.
Allow each coat to dry completely before applying the next. Follow the paint manufacturer’s recommendations for drying time.
Build up the paint until it sits slightly above the surrounding surface. You’ll sand it level in the next step.
Leveling and Clear Coat
After the paint cures completely (usually 24-48 hours), wet sand the repair area with 2000-grit sandpaper. Sand until the touch-up paint sits level with the surrounding surface.
Clean away all sanding residue and apply clear coat over the repair area. Use the same thin-coat technique as with the color paint.
Once the clear coat cures, polish the entire area to restore the original shine and blend the repair seamlessly.
Deep Scratch and Primer Damage Repair
Deep scratches that expose primer or metal require the most comprehensive repair approach.
Damage Assessment
Deep scratches often span significant lengths and may show multiple damage layers. Assess the entire scratch to plan your repair strategy.
Look for signs of rust formation, especially around metal exposure areas. Address rust immediately to prevent spreading.
Document the scratch with photos to track your repair progress and identify any areas that need additional attention.
Rust Treatment and Prevention
If you discover rust, treat it immediately with naval jelly or rust converter. These products neutralize rust and prevent further corrosion.
Apply rust treatment according to manufacturer instructions and allow complete curing time. Skip this step only if you’re certain no rust exists.
Even without visible rust, applying a rust inhibitor provides extra protection for exposed metal areas.
Primer Application
Clean primer scratches thoroughly and sand lightly with 2000-grit paper to create a smooth surface for new primer.
Apply automotive primer in thin, even coats. Primer fills the scratch and provides a proper base for paint adhesion.
Allow primer to cure completely according to manufacturer specifications. Rushing this step compromises the entire repair.
Sand the cured primer lightly with 2000-grit paper to create a smooth surface level with surrounding areas.
Paint and Clear Coat Process
Follow the same paint application process described in the paint scratch section. Take extra care with color matching since primer scratches often cover larger areas where color variations become more noticeable.
Apply clear coat over the entire repair area once paint cures completely. The clear coat provides protection and creates the glossy finish that matches your car’s original appearance.
Final polishing brings everything together and creates a seamless repair that’s virtually invisible.
Advanced Repair Techniques and Professional Tips
Some scratches require advanced techniques beyond basic repair methods.
Wet Sanding Mastery
Wet sanding is crucial for professional-quality repairs. Always use plenty of water and work in straight lines. The water lubricates the sandpaper and carries away debris that could cause additional scratches.
Start with finer grits and only move to coarser grits if necessary. You can always remove more material, but you can’t put it back.
Check your progress frequently by cleaning the area and examining it in good light. This prevents over-sanding and helps you achieve the perfect surface.
Color Matching Strategies
Perfect color matching can be challenging, especially with older vehicles where paint has faded. Test your touch-up paint on a hidden area first to verify the match.
If the match isn’t perfect, consider having custom paint mixed at an automotive paint shop. They can match your specific paint color more accurately than over-the-counter options.
Some paint colors, especially metallics and pearls, require special application techniques to achieve proper color and texture matching.
Blending Techniques
Professional-quality repairs require proper blending to avoid visible repair boundaries. Feather your repair materials well beyond the actual damage area.
Use light, overlapping strokes when applying compounds or polishes. This creates smooth transitions that the eye can’t detect.
Consider the panel’s natural contours and light reflection patterns when planning your blending strategy.
Common Mistakes to Avoid
Learning from common mistakes saves time, money, and frustration during scratch repair.
Rushing the Process
The biggest mistake DIY repairers make is rushing through steps. Each phase needs adequate time to work properly and cure completely.
Paint and primer need full curing time to achieve maximum durability and proper appearance. Skipping wait times leads to poor results and repair failures.
Take breaks between steps to evaluate your progress objectively. Fresh eyes often catch issues you might miss when focused intensely on the work.
Using Wrong Materials
Not all automotive products are created equal. Cheap polishing compounds and touch-up paints often produce poor results that require redoing the entire repair.
Invest in quality materials from reputable automotive suppliers. The cost difference is minimal compared to the time and frustration of failed repairs.
Match your sandpaper grit to the specific task. Using too coarse a grit creates more damage, while too fine a grit doesn’t accomplish the necessary work.
Improper Surface Preparation
Skipping cleaning steps or inadequate surface preparation causes repair materials to fail. Contaminants prevent proper adhesion and create visible imperfections.
Remove all wax, dirt, and debris before beginning any repair work. Clean surfaces are essential for lasting repairs.
Don’t forget to clean your tools and work area. Contaminated applicators can transfer dirt back onto your freshly prepared surface.
When to Seek Professional Help
Some scratch repairs exceed reasonable DIY capabilities and require professional intervention.
Extensive Damage Assessment
Multiple deep scratches across large areas may require professional panel repainting. Attempting DIY repair on extensive damage often produces poor results that cost more to fix properly.
Scratches on complex curved surfaces or areas with multiple paint layers (like door handles) present significant challenges for DIY repair.
If your initial repair attempts don’t produce satisfactory results, stop and consult a professional before making the problem worse.
Insurance Considerations
Check your auto insurance policy for coverage of scratch repairs. Some policies cover vandalism or parking lot damage with minimal deductibles.
Document all damage with photos before beginning any repair work. Insurance companies may require evidence of the original damage.
Professional repairs come with warranties that protect your investment. DIY repairs offer no such protection if problems develop later.
Cost-Benefit Analysis
Compare the cost of professional repair versus DIY materials and your time investment. Sometimes professional repair offers better value, especially for complex or extensive damage.
Consider your skill level honestly. Practicing on hidden areas or scrap panels helps build confidence before tackling visible damage.
Factor in the potential cost of mistakes. Botched DIY repairs often cost more to fix professionally than the original damage would have cost.
Maintenance and Prevention Tips
Preventing scratches is always better than repairing them after they occur.
Regular Washing and Waxing
Proper washing techniques prevent many scratches. Use the two-bucket method with grit guards to avoid transferring dirt back onto your car’s surface.
Regular waxing provides a protective barrier that helps minor scratches heal themselves or makes them easier to remove.
Avoid automatic car washes with brushes that can cause swirl marks and light scratches. Touch-free washes or hand washing provide better protection.
Parking Strategies
Park away from other vehicles when possible to reduce door ding and cart damage risks. The extra walking is worth protecting your paint.
Avoid parking under trees where branches can scratch your car or birds can damage the paint with acidic droppings.
Use covered parking when available to protect from weather and environmental damage.
Protective Products
Paint protection films provide excellent protection for high-impact areas like door edges and bumpers. While expensive initially, they prevent costly repairs later.
Ceramic coatings offer long-term protection and make minor scratches less likely to occur. They also make cleaning easier and more effective.
Door edge guards and bumper protectors provide targeted protection for the most vulnerable areas of your vehicle.
Conclusion
Car scratch repair doesn’t have to be expensive or intimidating. With the right knowledge, tools, and techniques, you can restore your vehicle’s appearance and protect your investment.
Start with proper damage assessment to choose the appropriate repair method. Take your time with each step, and don’t rush the process. Quality repairs require patience and attention to detail.
Remember that practice improves results. Start with less visible areas to build your skills before tackling prominent damage. Every repair teaches valuable lessons that improve your technique.
Most importantly, know your limits. Some repairs require professional expertise, and there’s no shame in seeking help when needed. The goal is restoring your car’s appearance safely and effectively.
Regular maintenance and prevention strategies help minimize future scratch damage. Clean regularly, wax frequently, and park carefully to keep your car looking its best.
With these techniques and tips, you’re equipped to handle most scratch repairs confidently and successfully. Your car’s finish will thank you for the care and attention you provide.