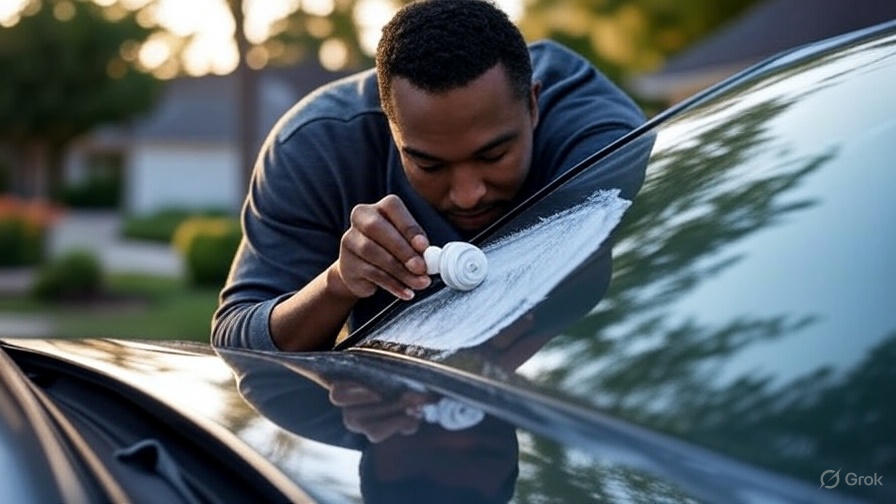
Car wax protects your vehicle’s paint, but sometimes you need to remove it completely. Old wax builds up over time, creating a cloudy appearance that dulls your car’s shine. Fresh wax won’t bond properly to surfaces covered with multiple layers of old product. This comprehensive guide shows you exactly how to get wax off car surfaces using proven methods that won’t damage your paint.
Why You Need to Remove Car Wax
Car wax removal becomes necessary for several reasons. Old wax accumulates dirt and contaminants that washing alone cannot eliminate. This buildup creates an uneven surface that prevents new wax from adhering correctly. Your car’s finish appears hazy instead of glossy when too much product accumulates on the surface.
Professional detailers recommend complete wax removal before applying new coatings or switching wax brands. Different wax formulations can react poorly when layered together. Some products contain ingredients that create chemical conflicts, resulting in streaking or discoloration.
Paint correction also requires clean surfaces free from wax residue. Polishing compounds and cutting agents work best on bare paint. Wax interferes with these processes, reducing their effectiveness and creating inconsistent results across your vehicle’s surface.
Essential Tools and Materials for Wax Removal
Successful wax removal requires specific tools and products designed for automotive surfaces. Microfiber towels form the foundation of any wax removal kit. These synthetic cloths lift wax without scratching paint. Standard cotton rags and paper towels leave behind fibers and can create micro-scratches.
Clay bars excel at removing stubborn wax buildup that other methods cannot eliminate. These malleable cleaning tools grab onto contaminants and pull them away from paint surfaces. Clay bar kits typically include lubricating spray that prevents scratching during use.
Chemical wax removers dissolve old product quickly and efficiently. These specialized solvents break down wax molecules, making removal easier. Popular options include isopropyl alcohol, commercial wax strippers, and acetone-based products. Each chemical works differently, so understanding their strengths helps you make the right choice.
Heat guns and hair dryers soften hardened wax, making it easier to wipe away. These tools work particularly well on thick wax buildup in crevices and textured surfaces. However, excessive heat can damage paint, so careful temperature control is essential.
Plastic scrapers and credit cards help remove thick wax deposits without scratching paint. Metal tools should never touch automotive finishes, as they create permanent damage. Soft plastic implements provide enough pressure to lift wax while protecting delicate surfaces.
The Dish Soap Method: Simple and Effective
Dish soap offers the gentlest approach to wax removal. This household product cuts through grease and oils, making it effective against most car wax formulations. The process requires patience but delivers excellent results without risking paint damage.
Start by rinsing your vehicle thoroughly with clean water. This initial rinse removes loose dirt and debris that could scratch your paint during the washing process. Work in shade to prevent soap from drying too quickly on hot surfaces.
Mix three tablespoons of liquid dish soap with one gallon of warm water. Avoid using soap with added moisturizers or antibacterial agents, as these ingredients can leave residue on your paint. Plain dish soap works best for automotive applications.
Wash your car using the two-bucket method. Fill one bucket with soapy water and another with clean rinse water. Dip your wash mitt in the soap solution, clean a small section of your car, then rinse the mitt in clean water before reloading with soap. This technique prevents dirt from contaminating your wash solution.
Pay special attention to areas where wax typically builds up. Door jambs, trim pieces, and textured surfaces often harbor thick wax deposits. Use a soft-bristled brush to work soap into these problem areas without scratching the underlying paint.
Rinse each section immediately after washing to prevent soap from drying on the surface. Dried soap leaves water spots and can bond to paint, creating additional cleaning challenges. Work systematically around your vehicle, completing one panel at a time.
Dry your car thoroughly using clean microfiber towels. Inspect each panel for remaining wax residue. Areas with stubborn buildup may require additional treatment with stronger methods.
Using Clay Bars for Stubborn Wax Buildup
Clay bars remove wax deposits that resist traditional washing methods. These professional-grade tools physically lift contaminants from paint surfaces through mechanical action. The process requires specific techniques to avoid creating scratches or swirl marks.
Begin with a clean, wet vehicle. Clay bars only work on lubricated surfaces, so adequate moisture prevents scratching. Most clay bar kits include spray lubricant designed specifically for this purpose. You can also use soapy water as an alternative lubricant.
Knead the clay bar until it becomes soft and pliable. Form it into a flat pancake shape about the size of your palm. This configuration provides maximum surface contact while maintaining control during use.
Work on small sections, roughly two feet square. Spray lubricant generously over the target area, ensuring complete coverage. Press the clay bar lightly against the surface and move it back and forth using straight lines. Avoid circular motions, which can create swirl marks.
The clay bar picks up contaminants as you work. Fold it frequently to expose clean surfaces. When one side becomes heavily loaded with debris, flip the clay bar over or reform it to reveal fresh material. Contaminated clay can scratch paint, so keep it clean throughout the process.
Listen and feel for changes as you work. Fresh clay glides smoothly over lubricated surfaces. When the clay begins to grab or drag, you’ve found contamination. Continue working these areas until the clay moves freely again, indicating a clean surface.
Wipe each section immediately after claying to remove lubricant and lifted debris. Use clean microfiber towels and work in straight lines. Inspect your work under good lighting to ensure complete wax removal.
Chemical Wax Strippers: Professional-Grade Solutions
Chemical wax strippers dissolve old wax quickly and completely. These powerful solvents work faster than mechanical methods but require careful handling to protect your vehicle’s finish. Different chemical formulations target specific types of wax and contaminants.
Isopropyl alcohol ranks among the safest chemical wax removers. This common solvent dissolves most wax formulations without damaging paint or trim. Use 70% concentration for best results. Higher concentrations evaporate too quickly, while lower concentrations lack sufficient strength.
Apply isopropyl alcohol using clean microfiber towels. Spray the solvent directly onto the towel rather than the car’s surface. This technique provides better control and prevents oversaturation. Work in small sections, allowing the alcohol to dissolve wax before wiping it away.
Commercial wax strippers offer stronger performance than alcohol-based solutions. These specialized products target multiple contaminant types, including old wax, polish residue, and road film. Follow manufacturer instructions carefully, as formulations vary significantly between brands.
Test chemical strippers on hidden areas before treating visible surfaces. Some products can affect paint color or finish, particularly on older vehicles with single-stage paint systems. Apply stripper to a small area inside the door jamb or under the hood, then wait for the recommended time to check for adverse reactions.
Work quickly when using chemical strippers. These products continue working until neutralized or removed, so prompt action prevents overexposure. Apply stripper to one panel at a time, allow appropriate dwell time, then remove completely before moving to the next section.
Ventilation becomes critical when using chemical wax removers. Work outdoors or in well-ventilated garages to avoid inhaling fumes. Wear gloves to protect your skin, and keep chemicals away from rubber seals and plastic trim, which can be damaged by strong solvents.
Heat-Based Wax Removal Techniques
Heat softens hardened wax, making removal easier in problem areas. This method works particularly well on thick buildup around trim pieces, door handles, and other detailed surfaces where wax accumulates over time. Proper temperature control prevents paint damage while maximizing cleaning effectiveness.
Hair dryers provide controlled heat for automotive wax removal. Set the device to medium heat and maintain a distance of six to eight inches from painted surfaces. Excessive heat can damage paint, clear coat, and plastic trim, so start with lower temperatures and increase gradually as needed.
Move the heat source constantly to prevent overheating any single area. Focus heat on wax deposits for 15-20 seconds, then immediately wipe the softened material away using clean microfiber towels. Work systematically across affected areas, heating and cleaning small sections at a time.
Heat guns offer more power than hair dryers but require greater care during use. These tools can reach temperatures exceeding 1000 degrees Fahrenheit, which will damage automotive finishes instantly. Use the lowest effective setting and maintain adequate distance from painted surfaces.
Monitor surface temperature by touch when using heat-based removal methods. Painted surfaces should feel warm but not hot. If you cannot comfortably keep your hand on the surface, reduce heat or increase distance from the heat source.
Thick wax deposits in crevices respond well to targeted heating. Use a plastic scraper or credit card to gently lift softened wax from detailed areas. Work slowly and avoid applying excessive pressure, which can scratch underlying surfaces.
Cool treated areas gradually after heating. Rapid temperature changes can crack paint or cause other damage. Allow heated sections to return to ambient temperature before applying any cleaning products or protective coatings.
Tackling Different Types of Car Wax
Different wax formulations require specific removal approaches. Natural carnauba wax dissolves easily with mild solvents and soap solutions. Synthetic polymer waxes resist basic cleaning methods and often require stronger chemical strippers or mechanical removal techniques.
Carnauba wax comes from palm tree leaves and creates the deepest, warmest shine available. This natural product softens with heat and dissolves readily in soapy water. Most carnauba wax responds well to the dish soap method combined with microfiber towel agitation.
Synthetic waxes contain polymer chains that bond more aggressively to paint surfaces. These products provide longer-lasting protection but resist removal efforts. Clay bars work effectively on synthetic wax buildup, as do chemical strippers containing acetone or similar strong solvents.
Paste waxes create thicker coatings than liquid formulations. These products often leave visible residue in panel joints and around trim pieces. Heat-based removal works particularly well on paste wax deposits, softening the material for easier elimination.
Spray waxes apply thin, even coatings that rarely create visible buildup. These convenient products typically remove easily with soap and water washing. However, multiple applications can accumulate over time, requiring more aggressive removal methods.
Cleaner waxes combine cleaning agents with protective ingredients. These products remove old wax while applying new protection in a single step. Complete removal of cleaner wax requires stronger methods than simple washing, as the cleaning agents create chemical bonds with paint surfaces.
Common Mistakes to Avoid During Wax Removal
Several common errors can damage your vehicle’s finish during wax removal. Avoiding these mistakes protects your investment while ensuring successful cleaning results. Take time to understand proper techniques before beginning any wax removal project.
Using dirty towels ranks among the most damaging mistakes. Contaminated cleaning cloths scratch paint surfaces and spread debris across your vehicle. Always start with clean microfiber towels and wash them frequently during use. Replace towels when they become heavily soiled.
Working in direct sunlight creates multiple problems during wax removal. Heat causes cleaning products to dry too quickly, leaving residue and water spots. Hot surfaces also make handling difficult and increase the risk of burns when using heat-based removal methods. Always work in shade when possible.
Applying excessive pressure during cleaning can scratch paint and create swirl marks. Allow chemical products and heat to do the work rather than relying on physical force. Gentle agitation with proper tools produces better results than aggressive scrubbing.
Mixing different chemical products can create dangerous reactions or damage paint finishes. Stick to one removal method at a time, and rinse surfaces thoroughly between different treatments. Never combine household cleaners with automotive chemicals.
Neglecting to test products on hidden areas can result in visible damage to painted surfaces. Always verify compatibility before treating large areas. Test spots should remain concealed even when doors and hoods are open.
Rushing through the process leads to incomplete removal and poor results. Take time to work methodically, ensuring complete wax elimination before moving to new areas. Patience during removal prevents the need for repeated treatments.
Professional vs. DIY Wax Removal
Professional detailing services offer expertise and specialized equipment for challenging wax removal projects. These services make sense for valuable vehicles, extensive buildup, or when you lack time and tools for DIY approaches. However, most wax removal projects can be completed successfully at home with proper knowledge and preparation.
Professional detailers use industrial-strength chemicals and equipment not available to consumers. Steam cleaners, professional-grade clay bars, and commercial solvents can remove the most stubborn wax buildup safely and efficiently. These tools justify professional service costs for difficult projects.
DIY wax removal saves money and provides satisfaction from completing the work yourself. Basic household products and automotive supplies handle most wax removal challenges effectively. The skills you develop through DIY projects improve your overall car care capabilities.
Consider professional services for classic cars, custom paint jobs, or vehicles with extensive wax buildup. These situations require specialized knowledge and equipment to avoid costly damage. Professional detailers carry insurance and have experience working with challenging finishes.
DIY approaches work well for regular maintenance and modern vehicles with clear coat finishes. Standard wax buildup responds well to household methods, and the financial savings make DIY removal attractive for routine car care.
Preventing Future Wax Buildup
Proper application techniques prevent excessive wax accumulation that requires aggressive removal methods. Thin, even coats provide better protection and appearance than thick applications. Most car waxes work best when applied sparingly and buffed thoroughly.
Allow adequate curing time between wax applications. Fresh wax needs time to bond with paint surfaces before additional layers are applied. Most products require 12-24 hours between coats for proper adhesion and performance.
Remove old wax periodically rather than continuously layering new applications. Complete wax removal every 6-12 months prevents excessive buildup while maintaining paint protection. This maintenance approach keeps your car looking its best while making future wax removal easier.
Use high-quality products designed for your specific needs. Premium waxes often require less frequent application and create less buildup than cheaper alternatives. Investing in quality products simplifies long-term maintenance while providing superior protection.
Keep detailed records of wax applications, including product types and application dates. This information helps you plan removal schedules and avoid mixing incompatible products. Good record-keeping also helps identify which products work best for your vehicle and conditions.
Final Steps and Paint Protection
After successful wax removal, your vehicle’s paint is ready for fresh protection or correction procedures. Clean, wax-free surfaces accept new products better and provide superior results. Take time to inspect your work and address any remaining issues before applying new treatments.
Wash your vehicle once more after wax removal to eliminate any remaining chemical residue. Use pH-neutral car soap and clean water to ensure completely clean surfaces. This final wash also reveals areas that may need additional treatment.
Inspect painted surfaces under good lighting conditions. Look for remaining wax residue, particularly around trim pieces and in panel joints. Address problem areas immediately while your tools and supplies are readily available.
Apply fresh wax or sealant promptly after removal to protect exposed paint. Bare paint surfaces are vulnerable to environmental damage, so prompt protection is essential. This new application will adhere better and last longer on properly prepared surfaces.
Document your wax removal process for future reference. Note which methods worked best and any challenges you encountered. This information helps streamline future projects and improves your technique over time.
Getting wax off your car requires patience, proper tools, and correct techniques. Start with gentle methods like dish soap and progress to stronger approaches only when necessary. Take time to work systematically, and avoid common mistakes that can damage your vehicle’s finish. With practice, you’ll master these techniques and keep your car looking its absolute best.

