If you want to boost the sound quality and power in your car, a car amplifier is the way to go. Many people think installing an amp is complicated, but it’s actually doable if you follow the right steps. This guide will walk you through everything you need to know about how to connect a car amplifier like a pro.
In this article
Why You Need a Car Amplifier
Your car’s factory audio system has limits. The stock speakers and head unit just don’t have enough power to fill your vehicle with rich, clear sound. A car amplifier boosts the audio signal and delivers more watts to your speakers, which means deeper bass, clearer vocals, and louder volume without distortion.
People install amplifiers for different reasons. Some want better bass impact from a subwoofer. Others want to power all their speakers equally. The goals vary, but the setup process stays fairly similar.
What Tools and Parts You’ll Need
Before you start the car amplifier installation, gather your materials. You don’t need fancy tools, but having the right ones makes the job easier and safer.
Essential items for amp wiring:
- Power cable or amplifier power wire
- Ground wire or amplifier ground cable
- Remote turn-on wire
- RCA cables (audio signal cables)
- Fuses and fuse holders
- Speakers and speaker wires
- Basic hand tools (screwdrivers, wrenches, wire strippers)
- Crimpers for making secure connections
- Electrical tape or heat shrink tubing
- A multimeter to check connections
- Safety glasses and work gloves
The power cable thickness matters. You need the proper gauge wire based on how far it travels and the amplifier’s power rating. A typical car amp pulling 50 amps needs a 4-gauge power cable. Bigger amps need thicker wires.
Your ground wire should match the power cable size. This is not optional. A bad ground creates noise, damage, and safety hazards. The ground cable carries the return electrical current, so it’s just as vital as the power line.
Plan Your Audio System Layout
Good planning prevents problems later. Take time to figure out where everything will go before you start working.
Key decisions to make:
- Where will the amplifier sit? (Usually under the seat or trunk)
- How will power and ground cables route through the car?
- Where will the head unit stay?
- How will you run the audio signal cables?
Most people mount amplifiers in the trunk or under the rear seats. This location keeps the power cable run short, which saves money and reduces voltage drop. Some people mount them behind the seats or in custom enclosures.
The head unit (or car stereo receiver) connects to your amplifier and acts as the control center. Make sure your new audio system will connect properly to your existing head unit or your new one.
Step 1: Disconnect Your Car Battery
Never skip this step. Always disconnect the negative terminal on your car’s battery first. This prevents electrical shocks and protects your vehicle’s electrical system from shorts and sparks.
Use a wrench to loosen the negative terminal clamp. Slide it off the battery post. Leave it disconnected until you finish all the wiring work.
Step 2: Run Your Power Cable
The power cable carries heavy current from your battery to the amplifier. This is the most critical wire in the entire system. You must run it separately from all other wiring. Never bundle it with audio cables or ground cables.
Steps to run the power cable:
Start at the battery. Connect a quality power cable to the positive post using a proper battery terminal connector. The connector should be crimped on, not just twisted. Twisted connections fail and cause fires.
Plan a safe route through your vehicle. You want the shortest path that avoids sharp edges, hot spots, and moving parts. Look at the engine bay and inside your car to find good pathways.
Feed the cable through the firewall. The firewall separates the engine bay from the cabin. Most cars have grommets or openings you can use. If needed, you can drill a new hole and use a rubber grommet to protect the wire.
Run the cable along the frame, under carpeting, or through door jambs depending on your car. Keep it away from the exhaust system and hot engine components. Use cable ties to secure it every foot or so.
In the trunk or engine bay, attach a fuse holder within 18 inches of the battery. This fuse protects the entire power cable from fire in case of a short circuit. Use the correct fuse size for your amplifier.
At the amplifier end, connect the power cable to the amp’s positive terminal. This connection should be tight and clean.
Step 3: Install Your Ground Cable
The ground cable completes the circuit and must be just as thick as the power cable. A weak ground causes system noise, poor performance, and dangerous electrical problems.
Run the ground cable from the amplifier to a solid metal part of your car’s frame or chassis. The best locations are the frame rail, a bolt on the car’s chassis, or the frame under the seat.
Before you connect the ground, strip back about an inch of insulation. Scrape away any paint, rust, or dirt from the metal contact point with a wire brush or sandpaper. The connection needs to be bare metal on both the cable and the chassis for proper flow.
Bolt the ground cable securely. Use a stainless steel bolt, washer, and nut if possible. Tighten it firmly so it can’t wiggle loose.
Poor ground connections are responsible for many amplifier problems. Take your time here. A bad ground costs you later in noise, unreliable performance, and potential damage.
Step 4: Connect the Remote Turn-On Wire
The remote turn-on wire tells your amplifier when to power on and off. This thin wire connects from your head unit to the amplifier.
Your car stereo head unit has a remote output wire, usually blue with a white stripe. This wire sends a signal when you turn on your stereo.
Run the remote turn-on wire through the same path as your power cable for neatness and protection. Keep it away from power and ground wires to prevent interference.
At the amplifier, connect this wire to the “remote” or “turn on” terminal. Check your amp’s manual for the exact location. If you can’t find it, the wire might go to a remote switch instead.
The remote wire should only carry a tiny current, just enough to activate the amplifier circuit. Without it, your amp stays in standby mode and won’t produce any sound.
Step 5: Run Your RCA Audio Cables
RCA cables carry the audio signal from your head unit to the amplifier. These are the thin cables with RCA connectors on each end. They’re nothing like the power cable.
Run RCA cables separately from power cables. Keeping them apart prevents noise and interference in your audio signal. This is crucial for clean sound.
The route matters. Take the RCA cables through the opposite side of the vehicle from the power cable if possible. If your power cable goes on the driver’s side, run RCAs on the passenger side.
Never bind RCA cables tightly around power wires. Keep at least a foot of separation when they must cross. If they run side by side, keep them several inches apart.
Connect the left and right RCA outputs from your head unit to the matching RCA inputs on the amplifier. Each cable has a center conductor and a shield. The center carries the signal, and the shield grounds it.
Use quality RCA cables. Cheap ones introduce noise and interference. Better cables have better shielding and connectors. You’ll hear the difference in sound quality.
Some amplifiers have multiple RCA inputs. You can control which input is active through the amp’s settings. Check your manual to confirm which input you’re using.
Step 6: Connect Speaker Wires
Speaker wires deliver the amplified signal to your speakers and subwoofers. These wires are thicker than RCA cables but thinner than the main power cable.
Your amplifier has multiple speaker output terminals. These might be labeled for front left, front right, rear left, rear right, and subwoofer.
Run speaker wires from the amplifier to each speaker location. Use appropriate gauge wire based on the distance. Short runs (under 15 feet) can use 16-gauge wire. Longer runs should use 14-gauge or thicker.
Strip about half an inch of insulation from each speaker wire end. Twist the tiny copper strands together so they don’t fray.
Most amp terminals accept speaker wire using either a spring-clip connector or a binding post. Spring clips require you to push a spring and insert the wire. Binding posts use a screw that you loosen, insert the wire, then tighten.
Make sure left and right speakers connect to the correct outputs. Connecting them backwards creates a thin, weird sound with weak bass.
If you have a subwoofer, it typically connects to a dedicated subwoofer output that delivers heavy bass frequencies. This connection is almost always on the amp, not the speakers.
Step 7: Install Inline Fuses
An inline fuse near your amplifier prevents damage if a short circuit occurs anywhere in the amplifier-to-speaker wiring. This fuse is separate from the battery-side fuse you installed earlier.
Most amplifiers need an inline fuse rated at about 50-80% of the amplifier’s maximum current draw. Check your amp manual for the exact size.
Install the inline fuse holder within a few feet of the amplifier. Connect it in the positive speaker output line. If the speaker wires short out, the fuse will blow and stop the short before it damages your amp.
Keep extra fuses with your amp setup. When a fuse blows, it’s usually because of a real problem like a short circuit, so you need to find the cause before you replace it.
Step 8: Check All Connections
Before you power anything on, visually inspect every connection. Loose or incorrect connections cause noise, poor sound, and potential fires.
Checklist before powering on:
- Is the battery terminal connection tight and clean?
- Is the ground connection secure and on bare metal?
- Are all RCA cables connected to matching inputs and outputs?
- Are speaker wires connected to the correct positive and negative terminals?
- Is the remote turn-on wire connected?
- Are all fuses installed with the correct rating?
- Are power and signal cables separated?
Use a multimeter to verify connections if you have one. Check that power reaches the amplifier and that ground is actually connected to chassis ground.
Step 9: Reconnect Your Battery
Now you can reconnect the negative battery terminal. Slide it onto the battery post and tighten the clamp firmly.
The amplifier should make a quiet clicking sound or show a light indicator when you turn on your car’s ignition. This confirms the remote turn-on wire is working.
Step 10: Configure Your Amplifier Settings
Most amplifiers have adjustable settings that affect how they work with your audio system. These are typically accessed through a remote control or buttons on the amp itself.
Common settings to adjust:
- Input sensitivity or gain
- Bass boost
- Crossover frequency
- Subwoofer volume
Input sensitivity controls how much the audio signal needs to be boosted. If your head unit has low output, you need higher gain. Start at the middle and adjust based on how the system sounds.
Crossover frequency tells the amplifier which frequencies to send to which speakers. A subwoofer crossover might be set to 80 Hz so it only handles low bass notes.
Take time to adjust these settings for the best sound in your specific car and music preference.
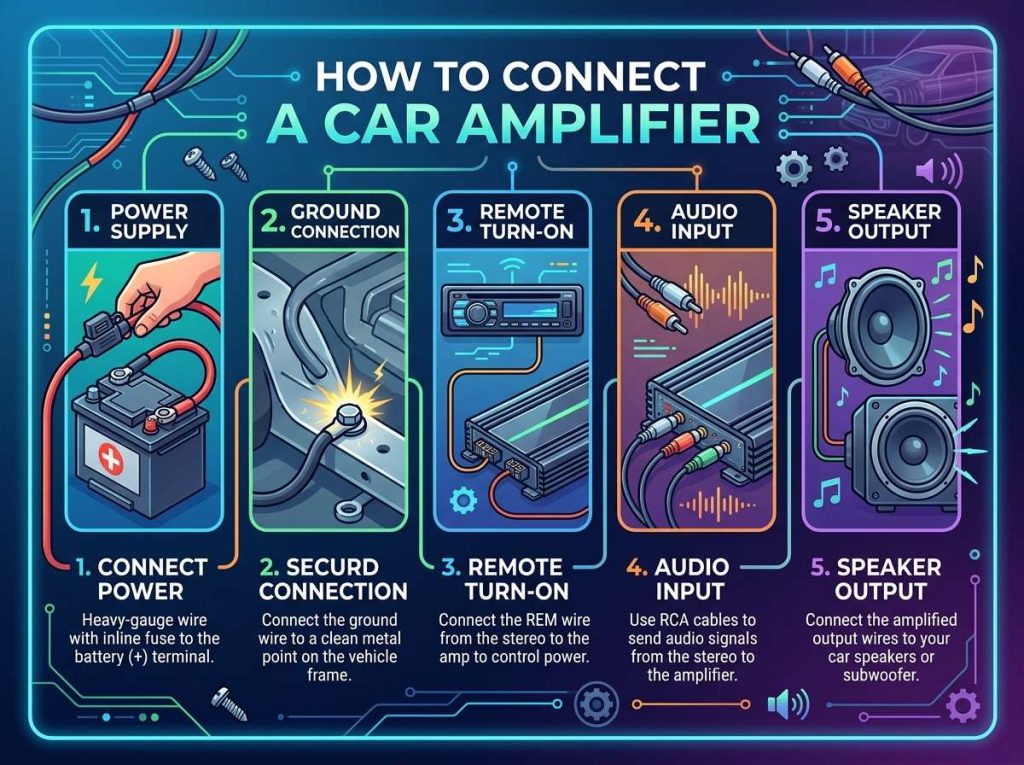
Car Amplifier Wiring Diagram Overview
Understanding how everything connects together helps prevent mistakes. The basic flow is simple:
Battery connects to the amplifier via the main power cable. The amplifier’s ground cable connects to the car’s chassis. Your head unit sends audio signals via RCA cables. The amplifier boosts these signals and sends them to speakers via speaker wires.
It’s a simple loop: power in, audio signal in, amplified signal out, ground return. Keep this basic flow in mind as you work through the installation.
Troubleshooting Common Problems
Sometimes things don’t work perfectly on the first try. Here are the most common issues and how to fix them.
Amplifier won’t turn on: Check the remote turn-on wire connection. Verify the battery is connected. Make sure the fuse isn’t blown.
System has loud noise or hum: Check all ground connections. Make sure RCA cables are separated from power cables. Verify that power and ground are both tight and clean.
No sound from the amplifier: Confirm RCA cables are connected and not damaged. Check that your head unit is set to the correct audio output. Verify speaker wires are connected properly.
Sound is quiet even with the volume up: Check input sensitivity settings. Verify RCA cables are fully seated. Make sure the head unit is sending audio signal to the amp.
Fuse keeps blowing: You have a short circuit somewhere. Carefully inspect all connections. Check for pinched or damaged wires. Never use a larger fuse to “fix” the problem. Find the real short.
Amplifier gets really hot: This is normal to some degree, but very hot means the amp is working hard. Make sure it has good air circulation. Check that the amplifier isn’t in a hot trunk in the sun.
Important Safety Tips
Working with car electrical systems requires respect for electricity. Follow these safety practices every time.
Always disconnect the battery first. Electricity kills, so never take chances. A disconnected battery is your main safety tool.
Wear safety glasses and gloves when cutting wires and making connections. Stray wires can snap and hurt your eyes. Gloves protect your hands from sharp edges.
Keep water away from all electrical connections. Moisture causes corrosion and shorts. If a wire gets wet, dry it completely before connecting.
Use the correct fuse sizes. Oversized fuses don’t protect anything and increase fire risk. Undersized fuses blow constantly and prevent your system from working.
Never run power cables where someone could trip on them or where they can be pinched by moving parts. Secure every cable properly with clips or ties.
If you’re uncomfortable working with electricity, hire a professional. It costs money upfront but prevents expensive damage and potential danger.
Professional Installation vs. DIY
Installing a car amplifier yourself saves money but takes time and skill. Professional installers have experience, proper tools, and insurance. They can usually install a system in a few hours.
Going the DIY route means you learn the system and can maintain it easily later. You also have full control over quality. Many people enjoy the hands-on experience.
Either way works. Know your own comfort level with electrical work. There’s no shame in paying a professional if you’re not confident.
Final Tips for Success
Work in a clean, well-lit area. You can’t make good connections if you can’t see what you’re doing. Good lighting also helps you spot problems before they cause damage.
Take your time. Rushing causes mistakes. A car amplifier installation isn’t a race. Spend extra time on connections. Clean connections work better and last longer.
Label your wires before you disconnect anything old. A simple label on each wire prevents confusion later.
Keep your amplifier manual nearby. It has details specific to your model that this guide can’t cover. Different amps have different features and connection methods.
Consider having a friend help. Two people can hold cables, pass tools, and spot mistakes better than one person working alone.
Test your system at low volume first. This catches problems before they blow fuses or damage equipment. Gradually increase volume as you confirm everything works.
Maintenance and Care
Once your amplifier is installed, regular maintenance keeps it working well.
Keep the amplifier area clean and dry. Dust buildup blocks air vents and causes overheating. Use compressed air to clean vents every few months.
Check connections occasionally, especially after long drives or in wet weather. Connections can loosen over time. Tighten anything that has moved.
Listen for new noises. A change in sound quality often means a connection is loosening or corroding. Address it quickly before it gets worse.
Protect cables from physical damage. Chafing on sharp edges eventually exposes the copper wires. Use cable covers or adjust routing to prevent this.
Conclusion
Connecting a car amplifier is totally doable for anyone willing to learn and follow instructions. It’s not magic or rocket science. It’s just following a logical process with careful attention to detail.
The most important rules are simple: separate power cables from audio cables, use proper gauge wires for power and ground, keep connections clean and tight, and install proper fuses. Follow these rules and you’ll have a professional-quality installation.
Your car’s audio system will sound dramatically better with a proper amplifier installation. The extra bass impact, clearer vocals, and louder volume without distortion make the effort worthwhile. Once you complete the installation and dial in the settings, you’ll appreciate the improved sound every time you drive.
Start with the right tools and materials. Take your time. Don’t skip steps. Ask questions if anything isn’t clear. Most importantly, respect electricity and follow safety rules at every stage. With patience and care, you’ll successfully connect your car amplifier and enjoy premium sound in your vehicle.