Do you ever get in your car, turn on your favorite tunes, and feel a little let down by the sound? It happens to many of us! Stock car audio systems often don’t deliver the crisp, powerful sound we dream of. Luckily, making your car speakers sound amazing isn’t rocket science. With a few smart upgrades and tweaks, you can transform your daily commute into a concert on wheels. Let’s dive into some easy ways to get better audio performance from your ride.
In this article
Start with a Clean Slate: Diagnose Your Current Sound
Before you go buying new gear, it’s a good idea to figure out what’s currently holding your sound back. This quick check-up can save you time and money.
Listen Carefully to the Existing System
Pay close attention to what you hear—and what you don’t. Is the bass muddy or non-existent? Are the vocals clear, or do they sound muffled? Do high notes, like cymbals, sound sharp and detailed, or do they disappear into the background? Try playing different types of music—rock, hip-hop, classical, podcasts—to get a full picture. Noticing specific problems helps you target the right solutions. For instance, if everything sounds flat, your speakers might be the main issue. If there’s a lot of buzzing, it could be a wiring problem or loose panels.
Check for Obvious Issues
Sometimes, the problem is something simple. Make sure all your speaker grilles are clear and not blocked by debris or objects. If a speaker is rattling, it might just be loose in its mounting. Check your audio settings on your car’s head unit (the stereo system in your dashboard). Make sure the balance and fader are centered, and that any EQ (equalizer) settings aren’t set to extremes that hurt the sound. Sometimes, someone might have messed with these settings, making your music sound bad. It’s also worth checking if your music source is high quality. Streaming low-bitrate audio won’t sound great, even on a fantastic system.
Upgrade Your Speakers: The Foundation of Good Sound
If your speakers are old, weak, or just plain bad, upgrading them is usually the biggest step you can take to boost sound quality. Think of speakers as the voice of your car’s audio system. If the voice isn’t good, nothing else will matter much.
Why New Speakers Make a Difference
Factory speakers are often made with cheap materials. They can’t handle much power, and they don’t reproduce a full range of frequencies well. This means your music sounds thin, weak, and distorted when you turn up the volume. Aftermarket speakers use better cones, stronger magnets, and more advanced designs. This lets them produce cleaner highs, richer mids, and tighter bass, even at higher volumes. You’ll hear details in your music you never knew were there!
Types of Car Speakers
There are two main types of speakers you’ll find for your car:
Coaxial Speakers
These are also called “full-range” speakers. They’re the most common type and the easiest to install. A coaxial speaker has all the individual speaker parts—the woofer (for bass), tweeter (for highs), and sometimes a mid-range driver—combined into one unit. They fit into the same holes as your factory speakers. They’re a great choice for a simple, direct upgrade that immediately improves the sound. You get a much clearer, fuller sound without needing to run extra wires or make complex modifications.
Component Speakers
Component speakers separate the different parts: you get separate woofers, tweeters, and crossover networks. The woofer handles the bass and mid-range, while the tweeter handles the high frequencies. The crossover acts like a traffic cop, sending the right sounds to the right speaker. This separation allows for much better sound imaging and staging, meaning the music sounds more like it’s coming from in front of you, with instruments placed in specific spots, rather than just from the doors. They sound fantastic, but they do require a bit more effort to install because you have to mount the tweeters and crossovers in separate places.
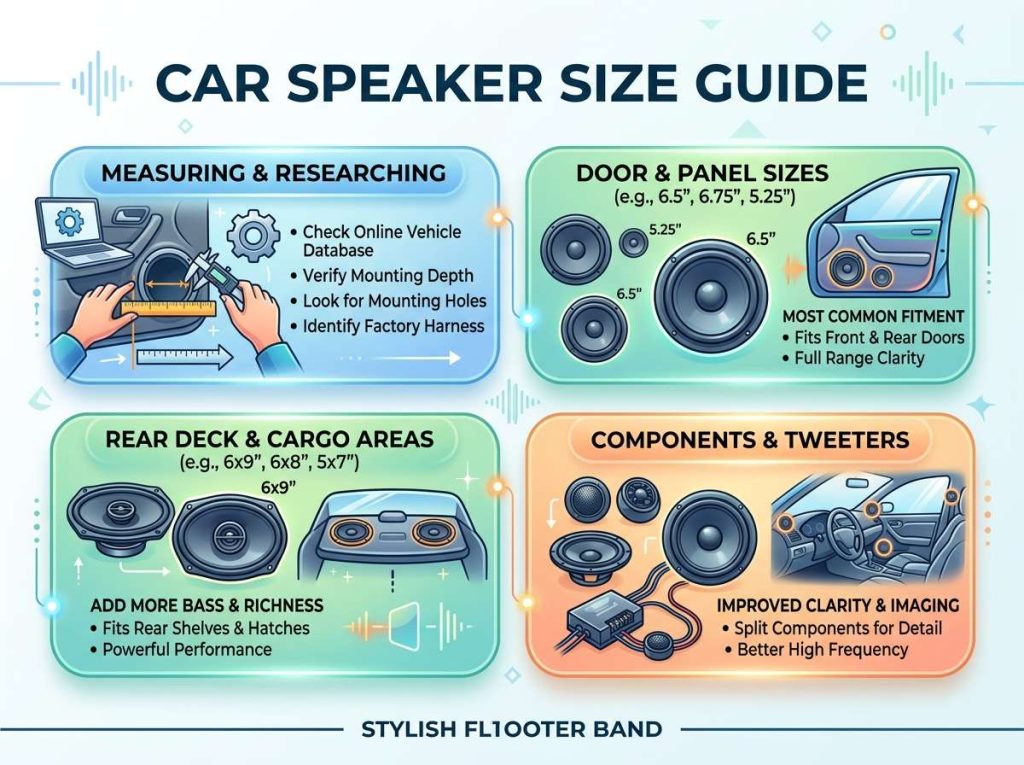
Matching Speakers to Your Car
Before you buy, make sure the new speakers will fit your car. Speaker sizes vary greatly, like 6.5 inches, 6×9 inches, or 5.25 inches. Many online tools or car audio stores can tell you exactly what sizes fit your specific vehicle model. Keep an eye on mounting depth too; some speakers are too deep for certain door panels. You also want to make sure the speakers can handle the power coming from your car’s head unit or an external amplifier. Look at the speaker’s RMS power rating – this tells you how much continuous power it can handle.
Add an Amplifier: Power Up Your Sound
Speakers need power to work their best. Your car’s factory stereo provides very little power, often barely 10-15 watts per channel. That’s fine for quiet listening, but try to turn it up, and you’ll get distortion and weak sound. An amplifier is like adding a bigger engine to your sound system.
Why an External Amplifier Helps
An amplifier takes the low-level audio signal from your head unit and boosts its power significantly. This extra power means your speakers can play louder and cleaner. They won’t struggle to move, leading to tighter bass, clearer vocals, and sparkling highs. Music will sound more dynamic, meaning the quiet parts are truly quiet, and the loud parts are truly loud, without sounding compressed or harsh. Even if you don’t plan on cranking the volume all the time, an amp provides headroom, ensuring your speakers always have enough power to reproduce sounds accurately.
What to Look for in an Amplifier
Power Output (RMS)
This is the most important spec. You want an amplifier that can deliver enough RMS wattage to match your new speakers. If your speakers are rated for 75 watts RMS, you’d want an amp that puts out around 75-100 watts RMS per channel. Don’t go by “peak power” numbers; they’re less helpful.
Channels
- 2-channel amps are good for powering a pair of front speakers.
- 4-channel amps are versatile and can power both your front and rear speakers, or your front speakers and a small subwoofer.
- Monoblock amps are designed specifically for powering a subwoofer.
Features
Some amps come with built-in crossovers, which help direct the right frequencies to the right speakers. Others might have bass boost controls. Look for an amp that’s stable at the impedance (ohms) of your speakers. Most car speakers are 4 ohms.
Installation Considerations for an Amplifier
Installing an amp involves running a power wire directly from your car’s battery, a ground wire, and RCA cables (signal wires) from your head unit. This can be a bit more involved than just changing speakers, so if you’re not comfortable with auto electronics, it might be a job for a professional installer. Proper wiring is crucial for safety and sound quality. A poorly wired amp can cause buzzing, humming, or even damage to your car’s electrical system.
Don’t Forget the Bass: Add a Subwoofer
Even the best door speakers can only produce so much bass. For that deep, chest-thumping sound that makes music truly immersive, you need a subwoofer. A subwoofer is a special speaker designed just for very low frequencies.
Why You Need a Subwoofer
Subwoofers fill in the very bottom end of the audio spectrum that smaller speakers just can’t reproduce. Adding a subwoofer takes the strain off your main speakers, allowing them to focus on mids and highs, which makes everything sound clearer. You’ll feel the music as much as you hear it. Bass notes become tight, punchy, and impactful, rather than muddy or absent.
Types of Subwoofer Systems
Component Subwoofers
These are just the subwoofer driver itself. You’ll need to put it in an enclosure (a box), which can be sealed or ported, depending on the type of bass you prefer. Sealed enclosures offer tighter, more accurate bass, while ported enclosures can be louder and extend lower. You then power this with a separate amplifier, usually a monoblock. This option gives you the most flexibility in terms of sound and appearance.
Powered Subwoofers
Also known as “active subwoofers,” these are all-in-one units that come with the subwoofer, enclosure, and a built-in amplifier. They are much easier to install and take up less space, making them a popular choice for those who want a simple bass upgrade without a lot of hassle. Some powered subwoofers are very compact and can even fit under a seat.
Placement Matters for Subwoofers
The best place for a subwoofer in a car is usually in the trunk or cargo area. Experiment with which way it faces (towards the rear, towards the front, or up) to see what sounds best for your vehicle. The acoustics of a car are tricky, and moving a subwoofer a few inches can make a noticeable difference in how the bass hits you.
Control Your Sound: Upgrade Your Head Unit or Add a DSP
Your car’s factory stereo (head unit) might be limiting your sound quality. An aftermarket head unit or a Digital Signal Processor (DSP) gives you much more control and a cleaner signal.
The Role of a Head Unit
The head unit is the brain of your car’s audio system. It’s where you select your music source, adjust volume, and often control basic tone settings. Factory head units often have weak internal amplifiers and limited sound processing capabilities. They might also color the sound in ways that are hard to correct.
Benefits of an Aftermarket Head Unit
- Better Sound Processing: Aftermarket head units usually have cleaner pre-amp outputs (RCA outputs) which provide a much better signal to external amplifiers. This reduces noise and distortion.
- More Control: They often come with advanced equalizers (EQ), time alignment features (which help make the sound arrive at your ears at the same time), and detailed crossover controls for fine-tuning your sound.
- Modern Features: You’ll also get modern connectivity like Bluetooth, USB ports, Apple CarPlay, Android Auto, and sometimes even built-in navigation.
- Increased Power: While not a replacement for an external amp, many aftermarket head units have more powerful internal amplifiers than factory units, offering a modest sound improvement on their own.
What is a Digital Signal Processor (DSP)?
A DSP is a sophisticated electronic device that gives you ultimate control over your audio signal. It can take the signal from your factory head unit (if you want to keep it) or an aftermarket one, and then clean it up and let you fine-tune every aspect of the sound.
How a DSP Works
A DSP will have very precise multi-band equalizers, allowing you to boost or cut specific frequencies to match your car’s acoustics. It offers time alignment, which measures the distance from each speaker to your listening position and delays the sound from closer speakers slightly so everything arrives at your ears at the same instant. This creates an amazing “center stage” effect. DSPs often have detailed crossover adjustments and can fix frequency response issues that are common in car interiors. For serious audiophiles, a DSP is a game-changer for achieving truly spectacular sound.
Integrating a DSP
A DSP can be added even if you keep your factory stereo, especially if you have a complicated factory system that’s hard to remove. This device essentially bypasses the limitations of the factory head unit, giving you a clean, adjustable signal to send to your amplifiers. It’s an advanced step, but very rewarding for sound quality.
Quiet the Ride: Sound Deadening
Even the best audio components can sound terrible if your car’s interior is vibrating and rattling. Sound deadening materials are designed to reduce road noise, block external sounds, and stop your car’s panels from vibrating.
Why Sound Deadening is Crucial
Imagine trying to listen to a finely tuned instrument in a noisy, resonant room – it wouldn’t sound great. Your car is similar. Road noise, tire hum, engine sounds, and rattling door panels all compete with your music. Sound deadening creates a quieter environment, allowing your speakers to shine. It also stops panels in your doors or trunk from vibrating along with your speakers, which causes unwanted buzzing and muddy bass.
Where to Apply Sound Deadening
Doors
This is arguably the most important place. Applying sound deadening to the outer door skin (behind the speaker) and the inner door panel creates a more solid, sealed enclosure for your door speakers. This drastically improves mid-bass response and overall clarity. It stops the door from acting like a giant, uncontrolled resonator.
Trunk
If you have a subwoofer, sound deadening the trunk lid, floor, and side panels is vital. This prevents the trunk from rattling and buzzing with every bass hit, and it also directs more of the subwoofer’s energy into the cabin.
Floor and Roof
For even greater noise reduction and a more serene cabin, you can apply sound deadening to the car’s floor and roof. This is a more involved process, but it makes a huge difference in reducing overall road noise. The quieter the car, the louder and clearer your music will sound, even at lower volumes.
Types of Sound Deadening Materials
- Butly-based Mat: These sticky mats with an aluminum layer are applied directly to metal panels. They add mass to the panel, which stops vibrations.
- Closed-Cell Foam (CCF): This material is great for decoupling plastic panels from metal ones, stopping rattles. It also acts as an insulation layer.
- Mass Loaded Vinyl (MLV): This is a heavy, flexible barrier that’s excellent at blocking airborne noise, like tire hum. It’s often used on the floor.
Applying sound deadening can be a weekend project, and while it adds weight, the improvement in sound quality and overall driving experience is significant.
Fine-Tune Your System: The Final Polish
Once you’ve installed your new gear, you’re not quite done. The final step is to properly set up and tune your components. This is where you can truly unlock the potential of your investment.
Set Your Amplifier Gains Correctly
This is super important! The “gain” knob on your amplifier is not a volume knob. It matches the output voltage of your head unit to the input sensitivity of your amplifier. If set too high, it will clip (distort) the signal and can damage your speakers. If set too low, you won’t get full power.
How to Set Gains Slowly and Carefully
- Turn your head unit’s volume up to about 75-80% of its maximum.
- Turn your amplifier’s gain all the way down.
- Play music with a good dynamic range.
- Slowly turn up the amplifier’s gain until you hear distortion.
- Then, back the gain down just a little bit until the distortion disappears. This is usually the best setting. Using an oscilloscope is the most accurate method, but the “by ear” method works well for most people.
Use Your Head Unit’s EQ and Crossover Settings
If your head unit or DSP has an equalizer, use it wisely. Minor adjustments can help compensate for your car’s acoustics. Don’t boost frequencies too much, as this can introduce distortion. It’s often better to cut frequencies that sound harsh rather than boost those that are missing.
If you have an amplifier with crossovers or a DSP, set the high-pass filter (HPF) for your main speakers to cut off the lowest bass notes (around 80-100 Hz). This sends those low frequencies only to your subwoofer. For your subwoofer amplifier, set the low-pass filter (LPF) to cut off higher frequencies (around 80-100 Hz), so it only plays the deep bass. This ensures each speaker plays only the frequencies it’s designed for, leading to a much clearer and more powerful sound overall.
Adjust Time Alignment (if available)
If your head unit or DSP offers time alignment, take the time to set it up. You’ll measure the distance from each speaker to your main listening position (usually the driver’s seat). Your audio system then delays the sound from closer speakers so that all sound waves arrive at your ears at precisely the same moment. This creates a much more focused and realistic soundstage, making it feel like the music is happening right in front of you, rather than coming from various points in the car.
Listen and Re-Adjust
Tuning is an ongoing process. Your ears might need time to adjust. Listen to a wide variety of music after each adjustment. Sometimes, a setting that sounds good with one song might not be ideal for another. Don’t be afraid to make small tweaks until you find the sweet spot that sounds best to you across all your favorite tracks. Patience here pays off immensely.
Consider Professional Installation and Tuning
While many of these upgrades can be done yourself, especially speaker and simple head unit swaps, more complex installations like amplifiers, subwoofers, and DSPs can be tricky. Running wires correctly, making sure everything is safely grounded, and tuning an entire system for optimal sound takes experience.
When to Call in the Experts
If you’re unsure about wiring, dealing with your car’s electrical system, or if you want the absolute best sound that’s perfectly tuned for your specific vehicle, a professional car audio installer is worth the investment. They have the tools, knowledge, and experience to get the job done right, safely, and efficiently. They can often diagnose complex issues and recommend the best products for your budget and goals. A good installer can also perform advanced tuning with specialized equipment, ensuring every component in your system works together harmoniously.
Enjoy Your Enhanced Car Audio
Improving your car’s speaker sound quality is a journey, not a destination. Each step you take, from simply upgrading a speaker to adding an amp, sub, or DSP, will bring noticeable improvements. You don’t have to do it all at once! Start with what bothers you most, whether it’s weak bass, muddy vocals, or just overall poor sound. Take your time, do your research, and enjoy the process of transforming your car’s audio system. Soon, every drive will be an absolute pleasure, filled with your favorite music sounding better than ever before. Happy listening!